DIY Car Paint Protection Film Installation: A Step-by-Step Guide
Installing paint protection film (PPF) on your car by yourself is doable but requires careful planning. Along with patience and a keen eye for details, you'll need to gather crucial items like the right film, a squeegee, and a specific solution in a spray bottle. The curveball? You'll also need to consider where you will do this important task. Remember, your work area plays an essential role in this DIY process, particularly concerning cleanliness, dust control, and temperature conditions. We're about to dig deeper into what it takes to prepare for a DIY car paint protection film installation project.
While it is possible to attempt a DIY installation of car paint protection film, it is not recommended. Professional installation ensures proper bonding, precise cutting of the film, and protection from dust and dirt during application. It's best to have a professional team with experience in PPF installation handle the process to ensure a perfect installation.
Self-Evaluation for PPF Installation
Prior to embarking on a DIY paint protection film installation, it's crucial to consider your personal strengths and weaknesses. The process of applying PPF demands patience, precision, and attention to detail. Think about whether you enjoy tasks that require special care. PPF installation requires close attention to ensure a seamless application, so being comfortable with the intricate work will make the process more enjoyable and effective.
It's also essential to evaluate whether you have prior experience handling similar tasks that call for focus and skill. If you're skilled at working with your hands, have successfully completed DIY projects in the past, or perhaps have a background in artistry or craftsmanship, these skills may be beneficial for executing the PPF installation effectively.
Moreover, assess the physical conditions of the installation environment. The area where the installation will take place must be clean and free from dust particles that could interfere with the adhesive properties of the film. Ensure that there is minimal dust and dirt in the air, and that the workspace is well-lit to facilitate clear visibility during the installation process.
Finally, consider temperature regulation. Extreme heat or cold can affect the pliability of the film during installation. Ideally, the room temperature should be around 65-72°F (18-22°C) for an optimal application process.
By conducting this self-evaluation, you're taking vital steps to ensure that you're well-prepared for the task ahead. As with any DIY project, careful consideration at the beginning is crucial for a successful outcome.
Necessary Materials for DIY PPF Application
To begin, the film itself is the main focus of our car paint protection film (PPF) installation. You want to make sure you're using high-quality film from a reputable source, preferably one with good reviews and proven results. This film will protect your car's paint, so it's essential that it provide durable, long-lasting protection against external hazards.
Next up is the squeegee. This simple tool is perfect for smoothing out the PPF and aiding in its adhesion to the car's surface.
Another essential item is a spray bottle filled with a solution of water and a small amount of baby shampoo. This is used to help position the PPF on your car once it's been cut to size. The solution acts as a lubricant, allowing you to adjust the film as needed before it dries and adheres completely.
A heat gun or hairdryer is also an absolute necessity. This tool helps activate the adhesive properties of the film, sealing it to your car's surface. It also aids in stretching and shaping around curved areas of your vehicle during installation.
Sharp, fresh blades are essential for precise cutting when you're dealing with angles and curves on your vehicle. A utility knife will serve you well in this case. Ensure that you have a clean and smooth work surface that is big enough—you need comfortable space to spread out while working on applying your PPF.
Pre-Application Preparations
Before you begin applying your paint protection film (PPF), make sure that both the car and your work environment are in good condition for a successful installation. The last thing you want is dirt trapped underneath, leading to unsightly air bubbles and imperfections after the film has been applied.
Cleaning the Car Thoroughly
First things first, cleaning. This isn't just about a quick wash and rinse—your vehicle needs a thorough cleansing to remove every trace of dirt, grime, and contaminants. Even the tiniest speck of debris left under the film can cause issues during installation.
Moreover, when the surface is meticulously cleaned before application, the PPF will adhere more effectively to the car's surface, guaranteeing a strong bond and reducing the risk of peeling or lifting over time. So, grab some good quality car shampoo and sponges, roll up your sleeves, and prepare to give your car a spa day!
Prepare the Work Area
Selecting an ideal work environment is crucial for a successful PPF application. You'll want to work in a place with ample lighting and minimal dust or particulate matter in the air. A stable temperature is also crucial to ensure contaminants don't get trapped beneath the film during application.
A well-lit workspace will allow you to clearly see any imperfections or debris before they become an issue. Stable temperature conditions can reduce the possibility of adhesion problems due to environmental factors. Also, choose a dry location—moisture can interfere with the adhesive properties of the film.
Specifics of the Application Process
Applying the protective film is like a delicate art form; precision and patience are essential.
Laying the Foundation
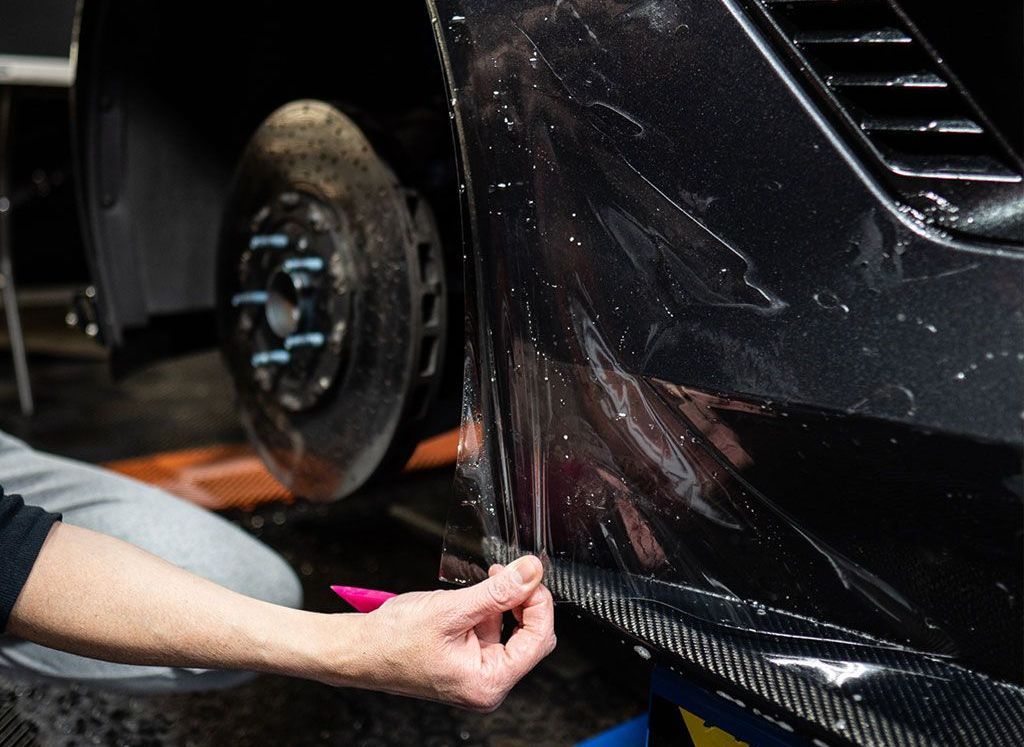
The first step is precision—measure, measure, and measure again. Take your time to carefully measure and cut the PPF to ensure an accurate fit. Once you have the right size, start by soaking both the film and the target area with a soapy water solution. This helps in positioning the film before using a specialized squeegee to push out the liquid and air bubbles.
The soapy water solution prevents immediate sticking of the film, providing a grace period to adjust its placement. Using a specialized squeegee limits the likelihood of scratching or damaging the film during installation.
Managing Heated Areas
Next comes working with curves and edges. This is where the heat gun becomes essential. Gently heat the film around these areas; it softens the material, making it more pliable and much easier for it to conform exactly to your car's body shape.
Be cautious when using the heat gun, and monitor its temperature closely to prevent overheating and damaging either the film or your car's paintwork.
Trimming and Sealing
Once applied, excess material should be carefully trimmed away using a sharp-edged tool. This step is crucial - leaving excess material could lead to it lifting or peeling over time, compromising the protection offered by the film. Paying close attention at this stage will help create clean, smooth edges for a finished look that seamlessly blends with your car's contours.
This process is similar to trimming freshly laid turf along garden borders - a steady hand ensures uniformity along every edge.
With precision measuring, expert heating techniques, and careful trimming, you're well on your way to mastering DIY PPF installation—a testament to both patience and skill.
Post-Installation Considerations
After completing the paint protection film installation process, a few crucial things should be kept in mind. Firstly, it's vital to allow the PPF to undergo a full curing process. This typically takes about a week, during which the film will bond completely with the surface of your vehicle.
During this curing period, it's essential to avoid washing your car with any harsh chemicals or abrasive materials, as that could interfere with the bonding process between the PPF and the vehicle's surface. Thus, if you're eager to give your car a thorough wash, exercise patience and wait until the one-week mark has been reached.
Failing to allow sufficient time for the film to cure can compromise its adhesion and negatively impact its effectiveness.
Additionally, initiating regular inspections of the PPF is key. By keeping an eye on the film for any lifting edges or potential issues, you can proactively address them before they escalate into more significant problems.
Regular inspections also provide an opportunity to ensure that the film is providing optimal protection for your vehicle. By promptly addressing any issues that arise, you can maintain the integrity of the film and ensure that it continues to safeguard your car's exterior.
For instance, if you notice a small portion of the film starting to lift around a corner or edge, addressing it immediately by pressing it back down will prevent it from escalating further. Ignoring such issues can lead to dirt and debris becoming trapped underneath the lifted section, potentially causing damage to your vehicle's paint.
Prioritizing these post-installation considerations will not only contribute to maintaining the effectiveness of your PPF but also extend the lifespan of your vehicle's exterior protection.
Heeding these post-installation considerations sets a solid foundation for ensuring that your PPF functions optimally over an extended period. Now, let's turn our attention to comparing DIY installation with a professional PPF application.
Comparing DIY to Professional PPF Installation
When contemplating the installation of paint protection film (PPF) on your vehicle, it's crucial to understand the differences between doing it yourself and hiring a professional. Let us break down some important points to consider:
Quality
One of the most significant disparities between DIY and professional car paint protection film installation is the quality of work. DIY installations demand excellent attention to detail, patience, and precision. Mismatched cutting or improper installation can result in poor aesthetics and reduced protection.
Conversely, professional installers have the expertise to achieve flawless results. They utilize professional-grade tools and possess extensive experience working with diverse vehicles, ensuring that every edge sits perfectly and every corner aligns precisely.
Skill and Expertise
Professional installers undergo comprehensive training to perfect their craft. They are well-versed in handling various types of paint protection films and possess advanced techniques to ensure a seamless finish without bubbles or visible edges. The level of skill and expertise they bring can make a substantial difference in the overall appearance and longevity of the PPF.
Time
DIY PPF installation can be quite time-consuming, especially for beginners. Achieving a bubble-free, seamless finish demands meticulous attention, from preparing the surface to carefully laying down the film without creases or wrinkles. On the contrary, professional installers can carry out an installation much more efficiently due to their experience and familiarity with the process, while ensuring top-notch results.
Warranty
Another significant advantage of professional PPF installation is that reputable installers often provide comprehensive warranties to cover any defects in the installation. This provides customers with peace of mind, knowing that they're covered in case there are issues with the installation down the line.
Final Words
Whether choosing DIY or professional PPF installation, thorough consideration of these factors will help you make an informed decision about protecting your vehicle's paint for years to come. Protect the paint on your vehicle with Paint Protection Film (PPF), but leave its application to professionals for optimal results.
Although DIY projects may seem tempting, achieving a flawless and bubble-free finish requires professional expertise. At Final Approach Detailing, we focus on both longevity and aesthetic appeal when it comes to vehicle detailing; our experienced professionals bring precision cuts that perfectly conform with any vehicle contour imaginable for a seamless application that stands the test of time.
If you need specialized assistance with your car painting projects or require more information about our services, feel free to reach out using our contact form.
Contact us at (517) 399-3231!
Providing Our Clients and Community with a "First-Class" Service Experience
Final Approach Detailing was officially founded in 2019, rising up from the clouds of trials and tribulations one of our owners faced throughout his young life. Establishing an auto detailing studio that specializes in ceramic coatings, paint protection film products, window tinting, paint correction, and various detailing services was only really part of the goal. We wanted to redefine the impact cars, trucks, SUVs, and other automobiles have on their owners and help make a difference in their quality as an asset in those customer’s lives. Working on countless makes and models, along with other types of vehicles most never get to, you will ALWAYS get a first-class vehicle care experience with us!
Quick Links
Hours of Operations
Monday - Friday: 8:00 AM - 6:00 PM
Saturday: By Appointment
Sunday: Closed
Service Areas
This website was designed by the team at Detailers Roadmap, a platform developed for detailing operators across the globe.